I recently posted a picture of a card I made that included a pop-up snowman on the inside. My friend Sheryl asked me to post the instructions for making a pop-up, so here is my simple method. Don’t let all the photos intimidate you. Once you make the first one, you’ll have it down. Here are all the pieces I used for this card. The only difference between this and any normal card is the snowman that will pop up inside the card and the strip of Basic Gray cardstock that measures 5 x 3/4 inches.
I have a sweet trick for stamping and punching the snowman pieces with the Snowman Builder punch. Watch for another tutorial to show you how to save time on that. I made almost 20 cards with this design, so I definitely wanted some time savers.
I'll skip over the steps to assemble the card front. When you're ready to make the pop-up, grab your inside piece with the words and the strip of Basic Gray cardstock.
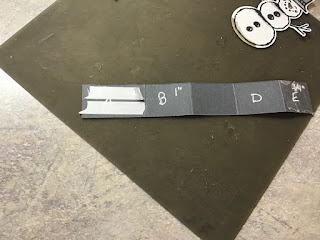
Score the Basic Gray strip at 3/4", 1 3/4", 2 3/4" and 3 3/4". Here's what it will look like.
I marked letters on the sections of the scored strip for reference with the photos. You don't need to mark them. The 1 1/4 inch long end is marked A and the 3/4 inch end is marked E. I didn't mark the C section because that piece will show when the card is open.
Put some Tear and Tape adhesive strips on the end marked A.
I like Tear and Tape for projects that will have a lot of movement because it holds better than the other types of adhesives, and I don't want my pop-up to come loose!
Remove the liner strips from the Tear and Tape adhesive on the A section and center it with the fold on the inside of the card as shown here. Make sure the fold of the strip is tight up against the fold of the card and stick it down good.
Then glue your word piece inside the card, covering the A part of the strip.
Next, put some Tear and Tape adhesive on the E end of the Basic Gray strip. It will be on the side facing up as you can see in the above picture.
Fold the Basic Gray strip at the center score line, fold the E piece so the adhesive is facing down toward the white word piece, and press it flat to glue it as shown here.
As you can see in the above picture, I have already put the adhesive on the D section of the strip. This is where your snowman will go. Fold the card part way closed so you can line the snowman up with the card as shown here.Press the snowman on and fold the card closed to press all the pieces so they lay flat.
Voila! There's your simple pop-up card!
Be sure to check back in a day or 2 for my tips on how to save time stamping the snowman to use the Snowman Builder punch.
Happy Stampin!


No comments:
Post a Comment