Tuesday 19 December 2023

Card Kits for Brittany


Hi Stampin' Friend!

My special niece Brittany (the one in the middle between the handsome guys in this photo of my brother's family) recently asked me to make her some card kits. I'm putting the card photos and directions here as a way to easily find them when she wants to make the cards, and we'll share them with the rest of you, too!

Here you go, Brittany - have fun and if you have any questions, send me a message.

Card 1: Green truck/Sending you sunny thoughts   

1.       Glue the vanilla circle with stamped trees on the dark green circle.

2.       Glue the green and gold plaid rectangle to the dark green rectangle.

3.       Hold the circle layer against the plaid layer to decide where you want the twine to be wrapped around. Wrap the twine two times around the rectangle layers and tie a bow on the front. You can tape the twine on the back of those layers to help keep it in place, if it helps.

4.       Glue the rectangle layers on the card front.

5.       Use the foam adhesive dots to add the circle layers to the card front.

6.       Use the foam adhesive dots to add the truck to the circle.

7.       Glue the large vanilla rectangle inside the card to write on.


Card 2: Compass/Happy Birthday 


1.       Glue the printed scenery square at the top of the white piece that has the compass and “Happy Birthday” stamped along the bottom edge. Leave equal white space at the top and sides of the scenery piece.

2.       Glue the white layer to the dark green layer.

3.       Glue the dark green layer on the card front.

4.       Glue the long narrow scenery layer at the left edge of the white piece that has “life is meant for…” stamped on it.

5.       Glue this layer inside the card.

Card 3:  Card 3 – Horse & rider/Birthday wishes  


1.       CAREFULLY apply dots of glue to the back side of the horse and rider die cut. Try to get some all the way around the edges as well as on the larger pieces of the die cut. The front is where the horse and rider are facing to the right.

2.       CAREFULLY Glue the die cut piece to the mountain scene printed paper. They are almost exactly the same size, with the printed piece just a hair smaller.

3.       Glue the die cut and printed layers to the front of the card.

4.       Glue “birthday wishes” to the bottom of the die cut piece.

5.       Glue the white rectangle with “it’s your day” inside the card.


Card 4 – Mountain scene, hiker and tent/Mountains of Thanks  


1.       The printed green and purple mountain scene is for the front of the card. The printed green piece with pine trees and plain white rectangle are for the inside of the card, trees on the top and white piece on the bottom when the card is opened and facing you.

2.       Choose the die cut pieces you would like to use.
a. The long green pieces with an irregular edge can be layered across the bottom of the mountain scene to give you some ground to put the other die cuts on. Arrange them as you like, then trim any edges that hang over the bottom or sides of the printed piece.
b. OPEN THE CLEAR PLASTIC ENVELOPE CAREFULLY!!! There are two very TINY walking stick die cuts inside. The walking sticks have adhesive on one side with a white layer over the adhesive. Gently peel the white layer off when you are ready to apply them to the card.
c.  Choose from the tents and people and decide how you would like to lay them out before applying glue.
d. If you want to use the hiker with a walking stick, use scissors to trim the lantern off the die cut before gluing it down.

3.       When you have your scene completed and the edges trimmed so it fits on the card front, glue it on.

4.       Optional – Glue the “mountains of thanks” word piece on the front. If you don’t want to use these words, the card will look just fine without them.

5.       Glue the tree piece and large white rectangle inside the card.


Happy Stampin' and Merry Christmas to you all, from Eric, Nellie and me!


Sunday 10 December 2023

Fresh as a Daisy and Earthen Elegance Card Class, Part 1 of 3


Hi Stampin' Friend,

I hope you're not getting bored with my One Sheet Wonder obsession by now. I'm not over it yet, and I already have plans to make another set of these cards with different patterned paper from Stampin' Up's January 2024 Sale-A-Bration brochure.

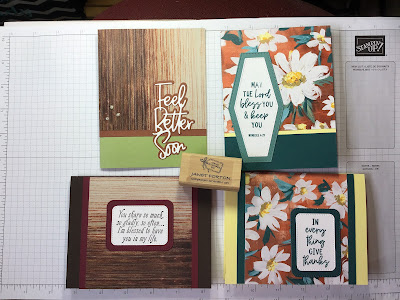
Counting down in reverse order, this is post 1 for my December 2023 card class. Here are cards 1, 2, 3 and 4 of 11 made from this 12x12 inch One Sheet Wonder cutting template.


And here is the original that I found on Kristina Rees's blog:


Enjoy the cards, and feel free to contact me if you have any questions about the designs that aren't answered below.

Cards from Earthen Elegance DSP


Cards from Fresh as a Daisy DSP

Cards 1 & 2 - 


Stamp sets: Sending Smiles and Peaceful Moments (retired)
All dies and punches on these cards are retired.

Cards 3 & 4 - 

Stamp on Card 3 (top) from Courage & Faith set
Stamps on Card 4 from Picturesque set (retired)
Punches: Card 3 Postage stamp (retired)
Card 4 Double Oval and Large Oval (retired)

I hope you like these cards. See the rest of the finished cards from this class in Post 2 and 3.
Thanks for looking!


Saturday 9 December 2023

Fresh as a Daisy and Earthen Elegance Card Class, Part 2 of 3


Hi Stampin' Friend,

Counting down in reverse order, this is post 2 for my December 2023 card class. Here are cards 5, 6, and 7 of 11 made from the 12x12 inch One Sheet Wonder cutting template shared in Post 1.

The photos above show the 12x12 designer series paper sheets before they were cut, along with the solid color cardstock I chose for the cards.

Enjoy the cards, and feel free to contact me if you have any questions about the designs that aren't answered below.

Card 5 & 6 -


Card 5 (top 2 cards) uses Just Wanted to Say die set 
and 2-inch Circle Punch (retired)

Card 6 (bottom 2) uses stamped image and word from
 In The Moment stamp set

Card 7 (top 2 cards) - 


Punches used: Double Oval, Pine Tree (retired) and Medium Daisy (retired)

Post 1 will feature the first 4 cards and the cutting template used to make them all.

Happy Stampin!


Friday 8 December 2023

Fresh as a Daisy and Earthen Elegance Card Class, Part 3 of 3


Hi Stampin' Friend,
Counting down in reverse order, this is post 3 for my December 2023 card class. Here are cards 8, 9, 10 and 11 of 11 made from the 12x12 inch One Sheet Wonder cutting template shared in the first post.

Enjoy the cards, and feel free to contact me if you have any questions about the designs that aren't answered below.

Cards 8 & 9 -
Die sets used: Essential Shapes and Just Wanted to Say

Card 10 (bottom 2 cards) - 


Punches used: Double Oval, Medium Daisy, Pine Tree (retired), 
Large Oval (retired), 2-inch Circle Punch

If you're wondering why the shapes on the 2 cards are mirror images of each other, it's because I did the diagonal cut on the brown tones card in the wrong direction!
But as you see, the card still looks great :-)

Card 11 - 


Punches used: Hexagon, Large Oval (retired)