Tuesday 19 December 2023

Card Kits for Brittany


Hi Stampin' Friend!

My special niece Brittany (the one in the middle between the handsome guys in this photo of my brother's family) recently asked me to make her some card kits. I'm putting the card photos and directions here as a way to easily find them when she wants to make the cards, and we'll share them with the rest of you, too!

Here you go, Brittany - have fun and if you have any questions, send me a message.

Card 1: Green truck/Sending you sunny thoughts   

1.       Glue the vanilla circle with stamped trees on the dark green circle.

2.       Glue the green and gold plaid rectangle to the dark green rectangle.

3.       Hold the circle layer against the plaid layer to decide where you want the twine to be wrapped around. Wrap the twine two times around the rectangle layers and tie a bow on the front. You can tape the twine on the back of those layers to help keep it in place, if it helps.

4.       Glue the rectangle layers on the card front.

5.       Use the foam adhesive dots to add the circle layers to the card front.

6.       Use the foam adhesive dots to add the truck to the circle.

7.       Glue the large vanilla rectangle inside the card to write on.


Card 2: Compass/Happy Birthday 


1.       Glue the printed scenery square at the top of the white piece that has the compass and “Happy Birthday” stamped along the bottom edge. Leave equal white space at the top and sides of the scenery piece.

2.       Glue the white layer to the dark green layer.

3.       Glue the dark green layer on the card front.

4.       Glue the long narrow scenery layer at the left edge of the white piece that has “life is meant for…” stamped on it.

5.       Glue this layer inside the card.

Card 3:  Card 3 – Horse & rider/Birthday wishes  


1.       CAREFULLY apply dots of glue to the back side of the horse and rider die cut. Try to get some all the way around the edges as well as on the larger pieces of the die cut. The front is where the horse and rider are facing to the right.

2.       CAREFULLY Glue the die cut piece to the mountain scene printed paper. They are almost exactly the same size, with the printed piece just a hair smaller.

3.       Glue the die cut and printed layers to the front of the card.

4.       Glue “birthday wishes” to the bottom of the die cut piece.

5.       Glue the white rectangle with “it’s your day” inside the card.


Card 4 – Mountain scene, hiker and tent/Mountains of Thanks  


1.       The printed green and purple mountain scene is for the front of the card. The printed green piece with pine trees and plain white rectangle are for the inside of the card, trees on the top and white piece on the bottom when the card is opened and facing you.

2.       Choose the die cut pieces you would like to use.
a. The long green pieces with an irregular edge can be layered across the bottom of the mountain scene to give you some ground to put the other die cuts on. Arrange them as you like, then trim any edges that hang over the bottom or sides of the printed piece.
b. OPEN THE CLEAR PLASTIC ENVELOPE CAREFULLY!!! There are two very TINY walking stick die cuts inside. The walking sticks have adhesive on one side with a white layer over the adhesive. Gently peel the white layer off when you are ready to apply them to the card.
c.  Choose from the tents and people and decide how you would like to lay them out before applying glue.
d. If you want to use the hiker with a walking stick, use scissors to trim the lantern off the die cut before gluing it down.

3.       When you have your scene completed and the edges trimmed so it fits on the card front, glue it on.

4.       Optional – Glue the “mountains of thanks” word piece on the front. If you don’t want to use these words, the card will look just fine without them.

5.       Glue the tree piece and large white rectangle inside the card.


Happy Stampin' and Merry Christmas to you all, from Eric, Nellie and me!


Sunday 10 December 2023

Fresh as a Daisy and Earthen Elegance Card Class, Part 1 of 3


Hi Stampin' Friend,

I hope you're not getting bored with my One Sheet Wonder obsession by now. I'm not over it yet, and I already have plans to make another set of these cards with different patterned paper from Stampin' Up's January 2024 Sale-A-Bration brochure.

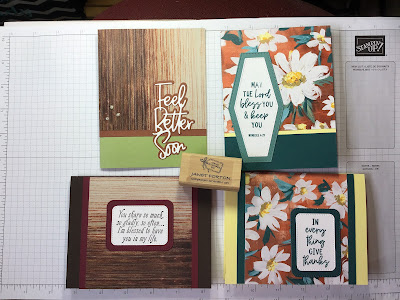
Counting down in reverse order, this is post 1 for my December 2023 card class. Here are cards 1, 2, 3 and 4 of 11 made from this 12x12 inch One Sheet Wonder cutting template.


And here is the original that I found on Kristina Rees's blog:


Enjoy the cards, and feel free to contact me if you have any questions about the designs that aren't answered below.

Cards from Earthen Elegance DSP


Cards from Fresh as a Daisy DSP

Cards 1 & 2 - 


Stamp sets: Sending Smiles and Peaceful Moments (retired)
All dies and punches on these cards are retired.

Cards 3 & 4 - 

Stamp on Card 3 (top) from Courage & Faith set
Stamps on Card 4 from Picturesque set (retired)
Punches: Card 3 Postage stamp (retired)
Card 4 Double Oval and Large Oval (retired)

I hope you like these cards. See the rest of the finished cards from this class in Post 2 and 3.
Thanks for looking!


Saturday 9 December 2023

Fresh as a Daisy and Earthen Elegance Card Class, Part 2 of 3


Hi Stampin' Friend,

Counting down in reverse order, this is post 2 for my December 2023 card class. Here are cards 5, 6, and 7 of 11 made from the 12x12 inch One Sheet Wonder cutting template shared in Post 1.

The photos above show the 12x12 designer series paper sheets before they were cut, along with the solid color cardstock I chose for the cards.

Enjoy the cards, and feel free to contact me if you have any questions about the designs that aren't answered below.

Card 5 & 6 -


Card 5 (top 2 cards) uses Just Wanted to Say die set 
and 2-inch Circle Punch (retired)

Card 6 (bottom 2) uses stamped image and word from
 In The Moment stamp set

Card 7 (top 2 cards) - 


Punches used: Double Oval, Pine Tree (retired) and Medium Daisy (retired)

Post 1 will feature the first 4 cards and the cutting template used to make them all.

Happy Stampin!


Friday 8 December 2023

Fresh as a Daisy and Earthen Elegance Card Class, Part 3 of 3


Hi Stampin' Friend,
Counting down in reverse order, this is post 3 for my December 2023 card class. Here are cards 8, 9, 10 and 11 of 11 made from the 12x12 inch One Sheet Wonder cutting template shared in the first post.

Enjoy the cards, and feel free to contact me if you have any questions about the designs that aren't answered below.

Cards 8 & 9 -
Die sets used: Essential Shapes and Just Wanted to Say

Card 10 (bottom 2 cards) - 


Punches used: Double Oval, Medium Daisy, Pine Tree (retired), 
Large Oval (retired), 2-inch Circle Punch

If you're wondering why the shapes on the 2 cards are mirror images of each other, it's because I did the diagonal cut on the brown tones card in the wrong direction!
But as you see, the card still looks great :-)

Card 11 - 


Punches used: Hexagon, Large Oval (retired)


Friday 20 October 2023

One Sheet Wonder Project with Earthen Elegance Designer Series Paper


Hi Stampin' Friend!

At long last, I found a chunk of time to finish this One-Sheet Wonder project that I began in the middle of summer. It isn't that it needed a large block of time - it's just that more urgent card needs kept popping up and pushed this one further down the list.

But here they are: 11 completed cards made from one 12x12 inch sheet of Designer Series Paper, along with 5 1/2 full sheets of card stock for the card bases and various other scraps for mats, die cuts and neutral colors for stamping the words.

Here is the original sheet, cut according to the template shared by Kristina Rees on her blog back in May, 2017.


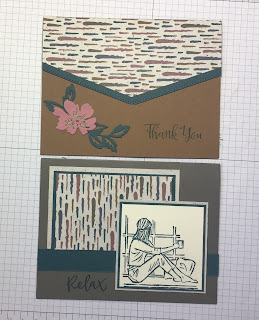
And now, feast your eyes on the variety of cards I made from all these pieces. I am pleased with how they turned out.

My favorite is the "Relax" card. Doesn't that scene look inviting, with a large window and a nice cup of coffee?

I am considering offering this as a class. If you would like to make cards like this, let me know!


Happy Stampin!

Jan Forton, Independent Stampin' Up! Demonstrator
Email: janstamps3681@gmail.com
Find more card inspiration on my Facebook stamping page: JForStamping


Tuesday 17 October 2023

Fall Fiesta 2023 - card making event at Neillsville

 Neillsville Fall Fiesta 2023


Wow, I can't believe it's been almost 2 months since my last post! I have been stamping a lot in those 2 months, and now that the weather is finally overcoming my fantasy of it still being summer, I should be indoors more and able to catch you up on my latest projects.

The 2023 Fall Fiesta in Neillsville was held on Saturday, with 22 stampers in attendance. We each made 15 different cards throughout the day. Once again it was a big success and enjoyed by all.

I provided card designs and kits for two tables again this year. The two cards above, using the Sweetest Cherries stamps and coordinating punch were mine, as well as the more manly cards here:

 
And the inside of that card:


And here are the rest of the cards. Most are the ones I made at the Fiesta, but where noted the cards are the table samples. There were a couple of cards that I decided to bring home to finish with my own touch.


The next 2 are the table samples from the Fiesta - I brought the supplies home to personalize the cards here.


My cards again:


And this super fancy fold card is the table sample -


There you have the 15 cards we made. If you are in the area and haven't attended the Fall Fiesta yet, I encourage you to watch for the announcement next fall. It's such a fun and rejunvenating day, and you end up with a number of completed cards with envelopes, ready to send. All you need to bring is your own adhesive, everything else needed to complete the cards is supplied.

I hope you get a little card inspiration for your own crafting time from these cards.

Happy Stampin!


Monday 28 August 2023

Camping and Stamping


Hi Stampin' Friend!

Eric and I had a wonderful time last week at Dexterville County Park. Those of you who have seen or heard about our very comfortable travel trailer may not call this "camping", but since we spent the days and nights in a campground, technically we were camping. :-)

I raided the UFO (Un-Finished Objects) box once again and took card-making supplies along with me. We had several very hot and humid days at the park and as you will see, I accomplished a lot in my air-conditioned home on wheels.


I had 2 sets of the "Ten Years of Growth" Paper Pumpkin kit, and assembled 18 of the cards from the kit, shown on the left here. I still need to stamp words on the included tags and put them on the cards. Then they will be ready to send.

The stack of cards on the right still need more attention than I was able to give them so they are still UFOs.


The stack of cards in the above photo just need card liners to complete them.


And best of all, the large stack of cards in this photo are complete, ready to send and make someone's day!

And a couple more looks at the campsite, just because :-)

Happy Stampin!


Wednesday 16 August 2023

Give Mystery Stamping a Try!


Hi Stampin' Friend!

Have you tried "Mystery Stamping" yet? I'm not sure which creative stamper first came up with the idea, but you can now find a number of opportunities to do it, either on a live or recorded online video.

Basically, using the stamping supplies you already have, you are given "clues" to follow to create a card. The first clue is usually the list of supplies you will need and measurements for cutting any cardstock or printed papers. The following clues walk you through the steps to stamp and assemble the card.

I enjoy the challenge of it, and I especially like the opportunity to dig out my older unused supplies and turn them into cards.

The three cards in the above picture are the results of Mystery Monday Stamping with TX Stampin Sharon on Monday, Aug. 14.

Here are close-ups of each card. I had enough of the printed papers to make 2 of each card. The presenters often don't mention it, but if you try a mystery stamping, be prepared to finish off the inside of your cards while you have all the coordinating supplies. Then they will be ready to send, as these are.

Happy Stampin!